Kirk here with the fourth and final post in my series summarizing some of the insights in the kenken YouTube video about how bridge design helped the Myoken No. 1 Bridge in Yatsushiro avoid total collapse.
The preceding posts can be viewed here:
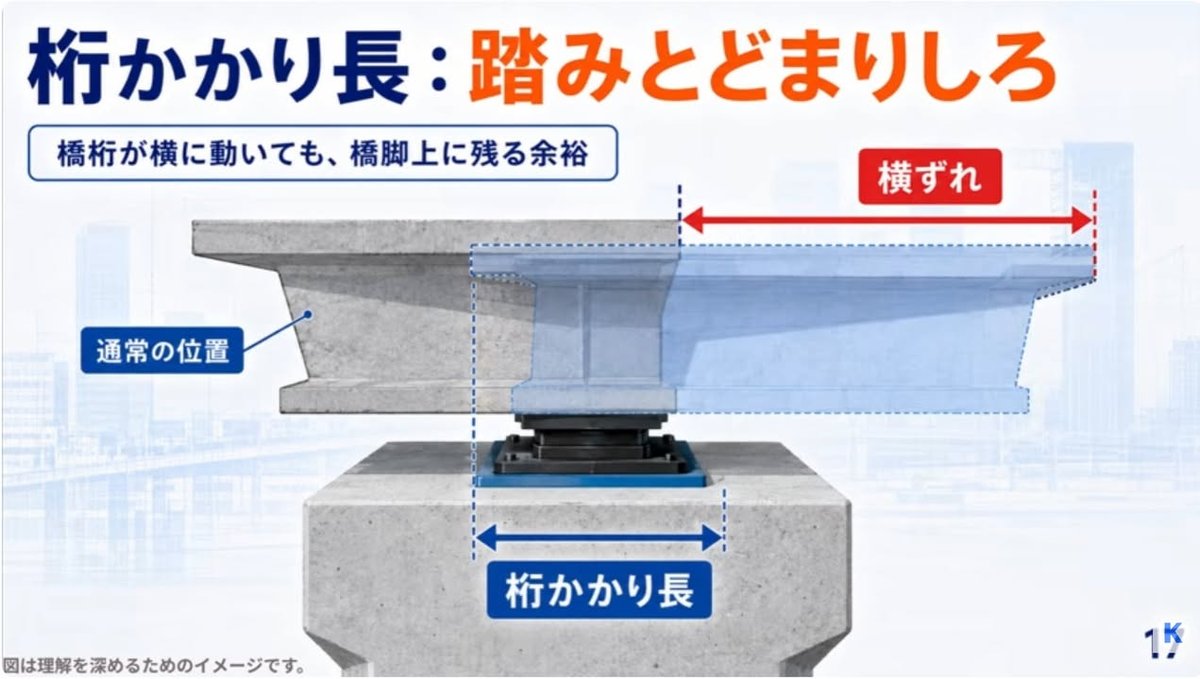
This final feature is extra supporting space on top of the pier that gives a displaced bridge girder room to remain supported rather than immediately falling off. The image from the kenken video illustrates the idea.
I'll let ChatGPT explain how this works and how it relates to the Myoken bridge.
--- start ChatGPT explanation ---
The Japanese term highlighted in this illustration is 桁かかり長 (keta-kakari-cho), which refers to the amount of supporting length available beneath a bridge girder where it rests on a pier or abutment.
The illustration shows the idea very clearly. The gray girder represents its normal position. The transparent blue girder shows it after a large sideways displacement. The red arrow marked 横ずれ shows that displacement. The blue arrow marked 桁かかり長 shows the supporting length available on top of the pier.
The important point is that 桁かかり長 is not a statement about how far the bridge is supposed to move. It is a safety margin. If bearings are damaged and the girder moves far from its normal position, a sufficiently large supporting area can give it somewhere to remain supported rather than immediately passing beyond the edge of the pier and falling.
This was directly relevant at the Myoken No. 1 Bridge. NEXCO West's expert committee reported that the bridge had sufficient width at the tops of its piers as one of several measures intended to make it difficult for the girders to fall even if the bearings were damaged. Together with girder connections and restraints on excessive movement, these measures were judged to have had “a certain effect” during the earthquake. [1]
NEXCO's more detailed material also identifies sufficient 桁かかり長 as one of the components of the bridge's fall-prevention system. [2]
This also helps clarify the previous post about the “lifeline” connections between girders. The badly displaced part of the Myoken bridge was not simply hanging from such a connection. NEXCO reported that a displaced girder became caught on the top of the supporting structure. The connections and restraints helped prevent complete separation, while the structure beneath the girder still provided physical support.
So the four features discussed in these posts work as layers rather than as four independent tricks. Bearings allow necessary movement. Restraints limit excessive movement. Girder connections provide another line of defense if movement becomes extreme. And sufficient supporting length on the pier can keep a badly displaced girder from falling even after the normal support system has been severely damaged.
That combination helps explain how the Myoken bridge could suffer extraordinary displacement and serious damage without the girders falling completely to the ground.
Sources:
[1] NEXCO West, results of the first expert committee meeting on restoration of the Myoken No. 1 Bridge, August 7, 2026.
https://www.w-nexco.co.jp/emc/emcpdfs/20260807153611-01.pdf
[2] NEXCO West, committee materials on the Myoken No. 1 Bridge, August 6, 2026.
https://www.w-nexco.co.jp/emc/emcpdfs/20260806163010-01.pdf
--- end ChatGPT explanation ---
I'm planning one more post on a related question that the kenken video does not consider in detail: to what extent the robustness of the Myoken No. 1 Bridge can be attributed to lessons learned from the catastrophic bridge failures in the 1995 Hanshin-Awaji (Kobe) earthquake.